Showing posts with label How To. Show all posts

Saturday, September 18, 2010

How to Make a Paper Spike Bow | Tutorials paper craft

This fun little paper craft is something my grandmother taught me to make as a small child. I usually make one when I want to add a special touch to a wrapped gift. They also look pretty sitting on a shelf or turned into a fridge magnet. Make a Paper Spike Bow
Here is what you need:
Wrapping paper or craft paper, glue- any craft glue that dries clear,
a sharpened pencil, scissors, a cup or other circular object to trace around,
a damp cloth to wipe up the glue that you are sure to get on your fingers!


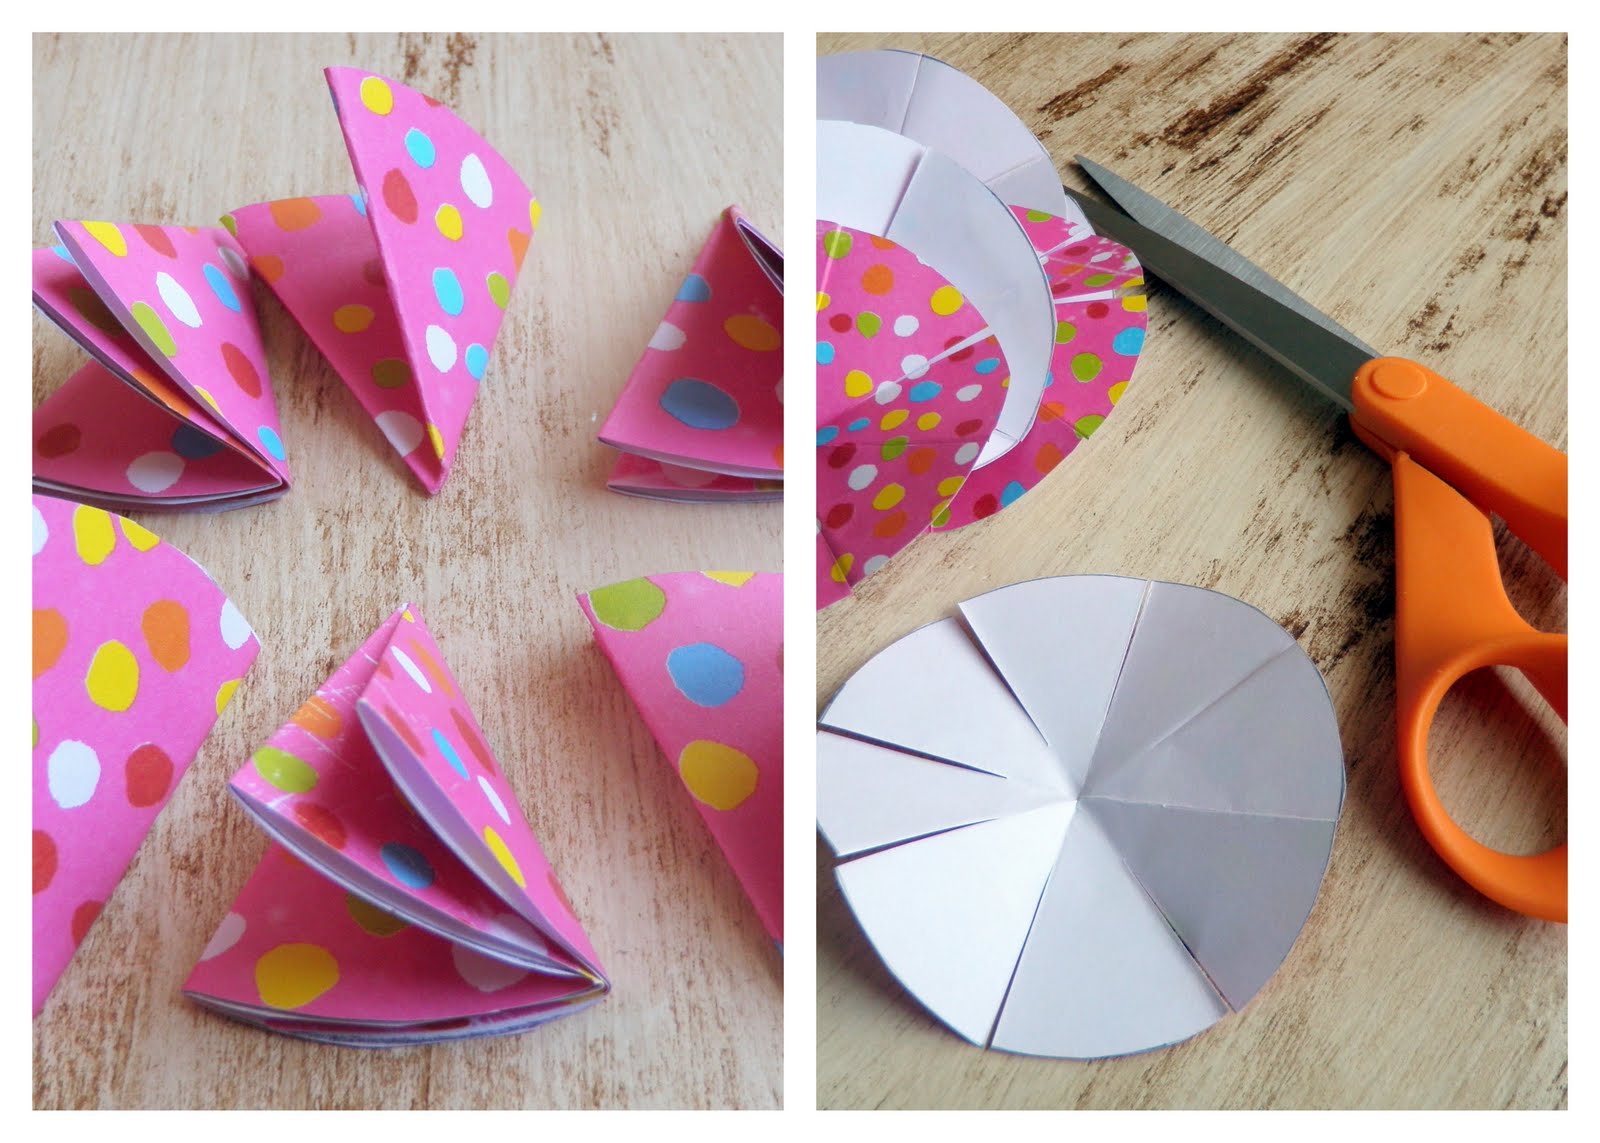
Trace & cut out several circles from your paper, 5 or 6 should do. Make a Paper Spike Bow Fold each circle in half, half again, and again (you will have 8 sections).
Cut on each fold line about 3/4 of the way, leaving the center in tact.
Make a Paper Spike Bow Roll each cut section by holding the pencil at an angle to one corner.
As you roll the paper around the pencil it will make a cone.
Add a dab of glue near the end. If your paper is heavy,
you may have to hold it in place for a moment so the glue can set.
This is where I get glue all over my fingers and
use the damp cloth to keep clean.
Make a Paper Spike Bow 
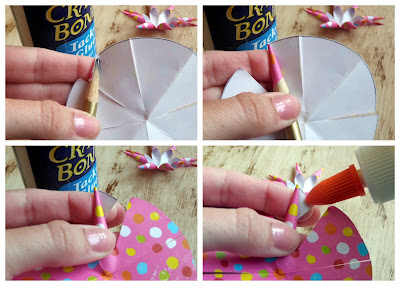
Now you are ready to assemble your bow!
Layer each circle one on top of the next with a dab of glue.
Be sure to off set each layer so the points land in between the
previous layer's points. When you get to the very middle,
use the eraser end of your pencil to stick the last layer in place.
Make a Paper Spike Bow 
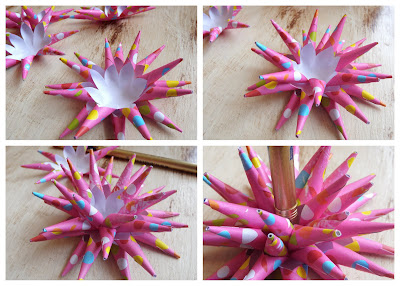
What a nice way to top off a gift! Make a Paper Spike Bow

Wednesday, August 25, 2010

How to stay beautiful-radiant looking while traveling

Traveling to different places is cool but at times it can be very damaging to your face, skin and hair. Different destinations can have different climates and weather, so if you are the jet setter kind, chances are, the harsh effects of differing climate can have a very adverse effect on your appearance.

But staying beautiful even while traveling is still possible, with some fine tuning with your usual beauty tips.

Here are some important tips on how to stay beautiful and radiant looking while traveling;

Moisturising
Whether the climate on your destination is warm or cool, it is a must to bring with you a face and body moisturiser to protect your skin from drying up.

And to avoid bringing too much products, it's best to invest in all in one moisturizers for the face and the whole body.


Sun Cream
If you will be out on the beach or will be visiting a particularly hot and humid place, you need to protect your skin from the sun's damaging rays by applying sunblock.

Even if you want a sun-kissed look to carry with you after a vacation, you will still need to apply some sun protection just to make sure you don't over do your tan and get irreparable damage from basking under the sun.

For your lips
Putting on too much lip color, or lip tints that stay too long, can both be drying for your lips. Instead you may want to bring along a medicated lip balm, with SPF and moisturizers to protect your lips from chapping.

It can be better to put on lip gloss instead of heavy lip color to have moist and pretty kissers.

Tame the tresses
Your hair can get easily frizzy when traveling to different places with different weather.

To protect your hair, you can carry along hair conditioning agents and basic shampoo to clean and keep you mane soft and beautiful.

Bring only the basics
To keep your travel hassle free, remember to bring only your basic make up. It is best to apply less make up when traveling and use products that can act in more ways than one, for instance lip and cheek colorants. Also, go easy on your mascara, some may not be well suited in very humid places, so if you can skip the mascara and keep eye color on the minimum, it is best to do so. archipelago sea adventures

While traveling and seeing the world, cut back on the amount of time spent on your beauty routine and enjoy focusing on the new sights surrounding you. Being lively, curious and interested in the world around you is the best beauty tip advice of all.

Thursday, April 15, 2010

How to make a sketchbook | tutorial sketchbook pro

Here is what you need to make a sketchbook:
A cutting mat, a cutting liner, a cutting tool, a scoring tool, a pencil and eraser, paper, cardboard, book screws and a hole puncher.
I wanted a sketchbook in the size of a square of 15cm by 15cm or 5,91" by 5,91" so I could scribble my wall art ideas in there.
I cut my paper larger because I will make folds in them: 15cm by 19cm or 5,91" by 7,48"
From the cardboard I made a template of 15cm by 17cm or 5,91" by 6,69"
Put the template on top of the paper and make a scoring line.
Fold the paper back on the scoring line and go with your scoring tool over the paper.
Use the template to cut out the cover of the sketchbook. Make it a tiny bit larger then the paper. That way, it will cover the paper that is not folded or cut nicely. You won't see it on the outside.
Tip: I go to home decoration stores and ask for wallpaperbooks that they are going to throw away. In those books, there usually are some very cool designs paper which are a much heavier quality then the wallpaper. You can use them perfectly for little projects like these. Fun and free!
Mark on the template where you want the holes to be. I did this 2,5cm or 0,98" from the side.Then punch a hole in the template and put the template on the folded paper. Trace the hole.
Now you can clearly see where to punch the holes.
Take your hole puncher and take the back part off so you can see where to punch.
Put a bunch of papers in between and punch the holes.
Make sure to do the same with the front cover of the sketchbook and also add a scoring line.
For the front cover, you also need to score over the paper to make it easy to open up your sketchbook.
Now you have everything ready to assemble.
Take the bookscrew and put it through the holes.
Close it up on the back of the book.
An now it's ready for me to draw. :)
Thank goodness I made this babushka stamp so it saves me to draw that shape each time! I just stamp it in the sketchbook. :)
I made numerous guestbooks and picture albums this way. Instead of using the cardboard cover, I used a thick piece of felt for it to make it prettier.
This kind of bookmaking is an easy way to add more pages later on as you can buy larger book screws.


Did you know I am really terrible at drawing? I am!
But sometimes, Needed a little sketchbook at a certain size and decided to quickly make myself one.
And while I did that, I took some pictures so I could share this with you.

Origami Paper Jewelry | folding Book Origami Art

black and graphite origami necklace black and graphite origami necklace

Liz says she's inspired by geometry, growth patterns in nature, and repetitive structures and processes.refolded map brooch refolded map brooch

What first attracted you to begin working with paper as your medium?

I began working with Beautiful paper when I was at college. I find it to be exceptionally versatile as a material and if a mistake is made, it's not expensive to replace and, of course, paper is ecologically sound. Artist's books - the book as an art form in its own right - interested me, especially sculptural ones. The paper jewellery came directly from this interest. I consider some of the necklaces I make to be sculptural Artist's Books as they are complete books.folded book necklacefolded book necklaceZipporah necklaceZipporah necklace

Have you always enjoyed working with your hands?

Yes, always. Beautiful Paper is fantastic as it's so direct, your only tool is your fingers. I also find the whole process of making to be very therapeutic and almost what I imagine meditating to be like.manga water balloon necklacemanga water balloon necklace

refolded map braceletrefolded map bracelet

music beadsmusic beads
Dandy comic book necklaceDandy comic book necklace

Do you show/sell your work in galleries?

paper jewellery is sold in local galleries and through the art group I belong to. folded bookfolded book
origami folded bookorigami folded book

Do you frequently wear your
own paper jewelry? How do people react to it?
Yes, I do wear my own jewellery, but normally only if I am going out. People are usually very complimentary about my work, although there have been a few people that really don't like the idea of me cutting up maps. I hasten to say all the books and maps I create with have been read/used... I never cut new ones!Japanese brocade origami beads Bangle made from The LadybirdBangle made from The Ladybird Read It Yourself series, Goldilocks & the Three Bears.
Monopoly money broochMonopoly money brooch
Source:- allthingspaper

Monday, March 29, 2010

How to make a paper bead necklace | beaded jewelry necklaces

Paper bead necklace is super easy to make. Decopatch paper, Things use to Deco patch glue (or other varnish glue like ModPodge), cotton paper beads, ribbon, wooden sticks, needle, glue pencil.

paper bead necklace


Tear pieces of Deco patch paper.


Tear them even smaller as we'll be working on
small paper beads so there will be less creases.


Take a wooden stick and stick it through the paper bead.
You can purchase the cotton paper balls in your local craft shop.


Put some glue in the lid of the jar.


Put some glue on the bead.


Dip your glue pencil in the glue and then pick up a tiny piece of paper with it.Stick it onto the bead and put some more glue over the piece of paper.
Then repeat until the bead is completely covered.


Let 'em dry.


I you like 'em shiny, then add another layer of varnish glue.


When they are dry, remove the beads from the sticks.


String the beads onto the ribbon.


And you're ready to go out!